Final Project: Week 1 concept to Week 10 finish
DESIGNING A 3N1 URBAN TODDLER FURNITURE

When I sat down to draw the 3-in-1 piece of toddler furniture that my husband, Jon, and I had discovered a couple years ago, I had no idea where to begin. After seeing a simliar piece made by an Amish couple over a decade ago, we had discussed how cool it would be to bring this idea into the 21st century. Ideally it could be collapsable, easy to put together, and incorporate interactive play electronics for kids. This concept would be perfect for the 'urban parents' who seek for ways to create the illusion of more space for their child to play.

I wanted to create a modular design: high chair, desk space and rollable car, depending on which way the piece stands. With this build, there are a lot of components that need fold into eachother and each version of the design has features that need associate and not disrupt the needs of the other two modes. At first, I tried building the design in easy to use platforms like TinkerCAD and a free version of inkscape. My first attempt in 2D was considerably sad:

Then I worked on it to get it to look like this: with a faux 'human' to help everyone, including myself, understand how the modular piece worked.

At first, the endless list of potental softwares overwhelmed me, despite Neil's expert pro and con list of each one. Solidworks is an "industry standard" one said, no, "Rhino" is the industry standard said another.... both of which would take at least three full intensive days to learn the basics. With limited time and little to zero disk space on my computer I decided to go with the webased tinkercad software. Despite many blank stares and eye-rolls when I had mentioned my decision, I found it had the quickest learning curve and no disk space necessary - my kind of program. Baby steps here... baby steps.
When first starting out trying to draw what was in my mind, felt impossible. My only experience with 2D and 3D software is a brief interlude with Inkscape. However, once I started using tinkercad, I realized that every apartment I moved into since I was 18, I had used a similar software to design and plan the three dimensional space that correlated with the blue print of my abode. In fact, I had way more experience wiht 3D CAD software than I realized... after a few days of playing with a design, this was the final outcome:

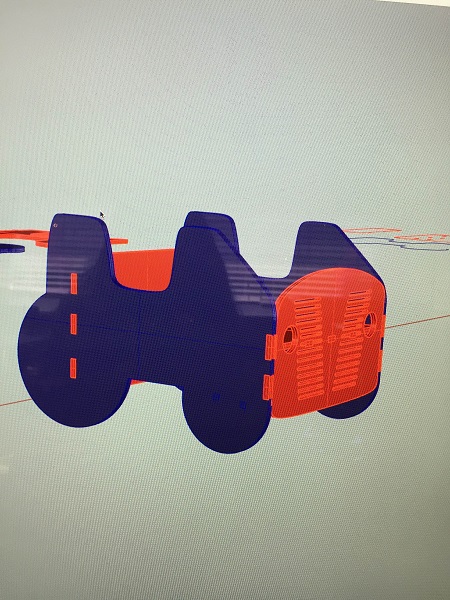
Returning to my final project after 9 weeks in the course, I realize that tinker cad is a terrible, terrible way to design my final project. While it's an intuitive, easy web based program, ther are significant limitations - such as simply rounding an edge! So, I finally found a computer with Rhino that I could borrow to work on my design. I started at the drawing board:

I was attempting to find a automobile that would encompass the design and still provide support for the chair to stand and lay on its side.

This very slow process of designing from scratch and googling everything you could possibly google about rhino3d was long and frustrating, but I created an inital draft of my idea.

And then I fell in love. I love rhino3D! Once you push through the learning curve, understand the basics, and learn a few tricks of the trade, Rhino is such a great CAD tool.

Now the next step: adding the joints. This was the hard part. Learnign how to Boolean union & difference all the seperate pieces was tough, and I kept fearing that I wouldn't be able to put the design back the way I had it after I pulled it apart to add the joints. I finally hit a wall and called a friend.

With some CAD help from Sam I was able to add in joints to all of my pieces. I learned some fun tricks I could apply when doing it on my own.
The best part of rhino is the twirl command. Your design rotates for you and you get to "ooh and awe" at what youv'e created. In fact I am certain I spent more time flipping my design around and looking at it from different angles than actually building it. Oh, and Zoom Select is a life saver.

Next step was to lay it out on a 4x8 foot sheet for MasterCam. This process actually took a lot of cleaning up. I was able to get help with a few commands that made the process siginificantly easier. I realize now that you can set the image up on Rhino for the CNC rather than simply setting it up in MasterCAM. I like this process better because setting it up in MasterCAM is much less user friendly. Mastering the layer function would help me peform this setup better.

Cutting on the CNC was very quick. However, we made a huge mistake in the setup. Unfortunately the set up did not make a separate run with a smaller bit for the pegs, which means I had to manually go through with a dremmel to fix it all! This was an incredibly time consuming process and I have had a long time to mull over the concep that putting more time in up front may be painful but it's a much better idea than being impatient... because it will destroy you in the long run.

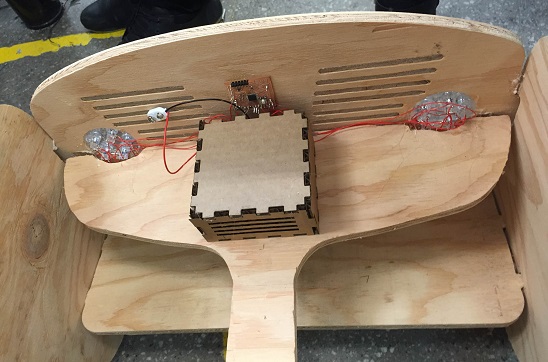
Now for the electronics piece. I thought it would be cool for motion sensing headlights to turn on when a child sits in the car seat, so I milled a fabduino and loaded a bootloader (as seen below).

Understanding the pins and how the fabduino would connect to the motion sensor was actually quite difficult fo ra newbie like me. This proces to much longer than it needed to but it definitely helpd me understand how electronics connect together.

After finally connecting the fabduino to my motion sensor (see blinging lights below) I now had to take the next step of connecting headlights to the board. The idea is that as a child sits in the seat for the car, the headlights to the car will turn on, however, this is easier said than done. The programming to make sure the headlights stay on when the child sits down will be a challenge.
To do that I would then have to connect an additional board to connect the headlights to the fabduino. This was a very simple little piece but it was necessary to ensure the lights could recieve the correct amount of current.

After miling this board, and realizing how much the DPI comes into play, I worked with Nathan to figure out how I could use a regulator to only use one power source, rather than powering from both an ftdi and a battery. This was a great idea, but I had trouble understanding how the regulator and nmosfet and headlights would all connect together. Ali, spent time with me helping me understanding the schematic and figuring out how the wires would need to connect (shown below).

After my electronics lesson I went back to my wooden piece. Let the dremmel-ing commece. My poor neighbors must have gone bonkers by the time I had finished fixing all my mistakes. The joints were too tight and I had not had a smaller bit run through for a final run, so all of my corners had to be cut out manually. I didn't realize that the holes should have been 1/16inch bigger to ensure my pegs fit properly... which led me to days of pain and suffering trying to fit it all together. I was able to redesign it in Rhino to fix my errors eventually, but I made myself suffer to ensure I would do it right next time.

My two CNC experiments kept eachother company on my deck.

Now back to electronics... my regulator experiment failed and I decided it made morme sense to have two power sources instead.

And now to test the lights, we programmed the code to blink. We then reprogrmmed it to blink upon movement. What we realized was that the motion sensor was incredibly sensitive and the lights would keep blinking even when movement wasn't completely apparent. Here's a quick snapshot of the acrilyc cut to look like headlights.

Testing out the headlights!
The final outcome of the project in all of it's transformations are shown below:


And finally, the summary. I'm calling it UrbanToddy 3N1
What does it do?
The UrbanToddy 3N1 is a transformative piece of toddler furniture for urban families that don't have enough space to store multiple pieces of large furniture. The 3N1 is designed to transform from a high chair to a tractor to a desk space for a toddler. Just one piece of furniture can enable utility and fun all day long.
Who's done what beforehand?
This design is based off a handmade amish piece found 15 years ago by a relative in Pennsylvania. The original design had a horse as the play toy rather than a tractor, was handcrafted, expensive, and did not incorporate modern day electronics.
What did you design?
I used the functionality of this amish piece as inspiration, and re-designed the piece into a modern, male-centric design, incorporating electronics to keep the toddler entertained, and ensure parents could recieve maximum utility out of a small space.
What materials and components were used?
I utilized left over plywood, acrylic for the headlights, 10 LEDs, two copper boards, a motion sensor, resistors, capacitors, and a atmega328P, and wires to connect the LEDs in parallel.
Where did they come from?
The majority of components were electronics from the architecture RPL. The rest of the components were a half used piece of pylwood from the architecture wood shop, and a leftover piece of acrilyc from a fellow student's project.
How much did they cost?
Plywood: $20
Acrilyc: $0
Two copper boards: $1
Motion Sensor: $4
Fabduino components & LEDs: est: $7
What parts and systems were made?
I built the full design of then final wooden product in Rhino from scratch and trasferred it to MasterCam in two different ways to find the best joint design. I also milled a fabduino board and soldered it with the necessary copmonents, a secondary board to connect my headlights to a Nmosfet, and connected the lights in parallel with spare wire from the RPL. I burned bootloader onto my fabduino (this was a first for me) which allowed me to program through the ftdi cable. I lasercut the acrilyc to hold the headlights and to create a space for the electronics to hide.
What processes were used?
Prior to this experience I had never used CAD, so I was excited by the idea of learning Rhino. After about 50 hours on my design I had definitely learned the basics of Rhino, but realized that I needed some more intense training. I met with Sam, an architecture student to give me a two hour lesson in Rhino and teach me some tricks of the trade. I realized that what had taken me almost 10 hours to do, I could have done in mere minutes. Although it was frustrating, it was a great learning experience and I would not have pushed myself to learn this software otherwise. I came to recognize how superior Rhino is over the CAD products I had been using in the past. One can see from my website how I originally approached the concept in TinkerCAD. In fact, my bowtie had originally been designed in TinkerCAD... now I laugh at myself for copping out and not investing the time necessary in a better software... in the end, I realize, it saves time to just "do it right".
Lasercutting the acrilyc was more simple: I measured the width of the lights, reduced my diameter by 1/16 of an inch to ensure it would fit in the end design, and cut. Although I had some experience with laser cutting prior to the class, my comfort in modifying the design in Rhino to apply it to the lasercutter facilitated all of my lasercutting efforts. Without knowing how to use rhino, this simple cut would have taken me four times as long.
I had never prorammed in arduino beforeand even though it wasn't particularly necessary in my case, I wanted to learn. I gave it a shot and milled the fabduino design, soldered it, and worked on connecting the right pins to the programmer. I am very glad I went the extra step to work with fabduino, mainly because it gave me a better understanding of how the board communicates with other devices. The nuances of the nmosfet, the corrent quantity of current, the i/o pins that I needed to make sure I was connecting correctly, and the programming where all great opportunities for me to understand how to connect electronics. In fact, here I am drawing my design and working with Ali to ensure all the pins are connected correctly.

What questions were answered?
I had the hardest time with joints. While I had learned Rhino, getting the joints right, the offset, and identifying the correct set up in MasterCAM was an enormous challenge for me. While I was able to work with someone to modify the CAM design, I was unable to recut the design, and decided it would really make me understand the value in investing time in the set up if I went through the pain of hand modifying the design. So I did. I spent days with a small dremmel, cutting away at the joints to make sure they fit properly. I found the error of my ways so apparent when I was trying to fit the final design together. Having this perspective on the difficulty of modifying something "after the fact" will forever change my mindset and approach when building. So the question I had was, why does all this bit changing stuff matter? And the answer was: "because otherwise you will spend days of your life trying to make it work and failing."
How was it evaluated?
The evaluation of the 3N1 changed with time. Originally, I wanted the 3N1 to have actual wheels for the toddler to roll around, with an interactive game on the desk space, a driver's wheel and a gear shifter that would make sounds as it was moved. Then, I understood how a somewhat "simple" idea, was way more complicated than I expected. My evaluation of my final project was whittled down to making a design that was an accurate prototype of the build, and incorporated both an input and output device. Having never used Rhino, MasterCAM, Arduino, or cut anything with a CNC, I found that this modified expectation of evaluation was much more realistic and certainly still a serious challenge.
I believe that the idea of this final project was to make you get out of your comfort zone and really learn the tools that you need to truly make whatever you want. I feel like have accomplished this goal and while all projects are relative to prior experience, I feel I have accomplished more than I ever thought possible in such a short time.
What are the implications?
The implications are two fold. First, my confidence. As a business student, I expect to build things as more of a hobby than a practie, however, as a student focused on tech startups, knowledge of the software and hardware that is inherent in these businesses is invaluable. Being able to speak to programmers and understand as well as relay the information necessary to the right parties, I have already found to be essential and revolutionary.
Second, my capabilities. I do feel that I have the tools to build whatever I want. I also know how long these things will actually take. I can understand how they are built, what it requires, and find shortcuts to get there. I realize that there are a hundred ways to do the same thing, and none of them are right - it's really up to you. When I move into an apartment and want to install motion sensor lights... no biggie. If I want to build a bookcase for the wall... no problem. If I want to fix my engine... I'll hire someone. Because what I've learned that is MOST important in this class, is to know that it saves time and improves quality to go to an expert and ask for help. It also helps you learn the right way to do something. Sam, Chris, and Ali were incredible in the amount of guidance they gave me. They didn't do anything for me, they just taught me the tricks and watched me while I figured it out. I couldnt' have done it without the collaboration of classmates like ours.